Small striped bag with flower & Handmade 1st Birthday Card

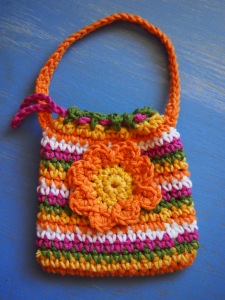
Today is the second 1st birthday in our mother’s group so we have a party to go to, it’s very exciting! I made this small striped bag with a flower as a gift, I hope she likes it!

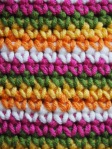
I used 5 colours from my batch of cotton blend, it’s a thick yarn so I used my 4mm hook. It’s a simple bag, changing colours every row of sc using orange, yellow, green, purple and white. I didn’t follow a pattern for the flower either, just did a couple of rounds in yellow ending up with 16 sc, then changed to orange and did 8 petals. Each petals started as 3 ch in every 2nd sc, then the second row is 5 sc into the sp with a sl st to start a new petal. I used fine cotton and needle to do a simple running stitch to attach the flower to the front. For the bag, a sc ch lip for a ch handle to be threaded through, and a larger ch handle with a second row of sc in orange. The one thing I’m unhappy with is this cotton is too thick to thread through my needle so I couldn’t finish off the ends very neatly. Instead I have to weave them in with my crochet hook which means the ends can poke through easily. Eventually there will be some loose ends visible in this bag which will make it look a little rough. Hopefully that will add to the home made character of it!
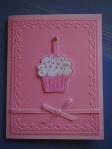
To go with this gift my mum made a special home made birthday card, which is very nice! I’ll also include a small Fisher-Price little people car inside the bag, and of course a book which I always love to give children! Children can never have too many books!
A Christmas Eve Tea Cosy

This is my first attempt at a tea cosy, and considering I didn’t have the tea pot with me at the time to fit to measure as I went,  it turned out damned well!

It was pretty damn lucky this thing fit, but I did use a stitch that has a lot of stretch in it so it had a chance. I chose some nice soft acrylic my mum had spare and started with two rectangles of alternating rows of ridges. In hind sight, the ridges should have gone vertically instead of horizontally for even more stretch. This would increase the chance of the cosy being used for different tea pots. I chose the cheery and bright yellow colour, not only because it felt soft and would be nice to work with, but because it is a sunshiney happy colour for good luck, perfect for a family kitchen.

I was staring at the two rectangles wondering how to fix it all up as there were several options. In the end I opted to do a quick job with minimal fuss, with 1 dc 1 ch along the top for the ch pull handle. Next time this should only be 1 sc 1 ch to reduce heat loss. If I wanted to do a really good job, I could do two layers and sew them together with a 1 sc 1 dc lip, or maybe that would need the 1 dc 1ch lip, because it will be that much thicker. Also, there should be another row of dc above the lip, to further reduce heat loss. All good to note for the future, in case any one else wants me to make them a tea cosy.

I whipped up this tea cosy on Christmas Eve while everyone else slept and I couldn’t. It took me just under two hours, and I used either my 3.5mm or 4mm hook. On Christmas day I did a free form patch on my brother’s damaged beanie, I just used some blue that was on hand, it doesn’t match very well but I’m sure it doesn’t matter as this beanie is bound to end up in the bin. It was very tricky, especially as I’ve never done it before, but because I am so clever I did an absolutely awesome job!! I can not for the life of me imagine why anyone would think it was ok to take to an especially made custom crochet beanie with a pair of scissors to rig up a tea cosy, but truth is stranger than fiction it seems. Thanks for taking some time to read my blog.

Colourful ABC 123 Cube for a Baby

Here is an upgrade of my first attempt at a baby block. This one is for a gift, as we are part of a Kris Kringle this year. This cube has numbers and letters on it, as well as a bell inside to make it jingle!

I find our culture of gift giving at times very challenging. I’d rather give gifts as a matter of course, when things arise that someone needs or wants, then you give it to them if you can. I don’t like having to wait for a special occasion, then there is this culture of having to give a gift,  giving gifts the receiver does not need or want. This, in turn, increases the consumerism and rubbish that piles up on our planet. But unfortunately, I am a social creature, being a mammal and all, so I’m compelled to participate in this ritual and not cause offence to my friends and family. But sometimes I just wish we would get more practical with this gift giving thing! I think even gift vouchers are better than an unwanted gift, but for some people this is not in the spirit of it, and they don’t like it. I just loathe to see people on modest incomes waste their money on expensive gifts that are not needed.

A month or so ago we had a hail storm here in Brisbane, which caused some damage to the roof of my friend’s house. She lost her potted basil plants, so a perfect gift for her (I think, anyway), is a new basil plant! I took a cutting from my youngest plant, and put it in a vase on my kitchen sill. Now it has lots of nice new roots and is ready to plant in a nice pot. I just have to get some more potting mix and it will be ready for its new home.

Yet another Christmas, here we come!

Colourful Crochet Baby Cube

I was going to make a set of these soft baby blocks, and did this first one last year before Thomas was born. Now, I don’t think I’ll make any more quite like this.

I simply made 6 x 10cm squares of various colours in the same thick cotton I used for the drink coasters. They were fairly quick to make up, then I started joining them up into a cube with the black. I chose these colours because these were the brightest colours I had at the time, and the contrasting black is attractive to the eyes of babies. I then packed the inside with stuffing consisting of scraps of material saved from my sewing projects. I was unhappy with how the cube shape came out. If I packed it too much, it started to resemble a sphere! So I had to remove some stuffing, then the cube was a bit sloppy. So if I make any more cubes like this, they will need a firmer stuffing in the shape of a square, and the cube will have to be made to fit the stuffing. Hence why I probably won’t make any more, as I don’t have any stuffing material like that on hand, and I don’t want to buy it as I think it’s too expensive for what it is!

So here is an odd shape to throw into Tom’s toy box. Maybe in future I can make a sphere and a rectangle to match …

In other news, our little family has just got over colds that Thomas caught at a playgroup I took him to last week. That was the first time I’ve taken him to a playgroup and I won’t be taking him back. All we got out of it was the cold! This is the first time Thomas has had a runny nose and only the second time he’s been sick as the first time was a sore throat with fever. It was so awful listening to him breath through a runny nose all night! I know it’s good for his immune system to start building up resistances to these germs, but I don’t think he should spend his entire babyhood sick and uncomfortable. Getting sick only twice in 10 months is doing pretty well so far, considering how much illness is around!

Colourful Scrap Rug for a Toddler

This rug started off as a pile of scraps given to me by my mother last year, and is now the second rug like this I’ve done. I’m hoping it will be a useful rug for Thomas.

I really enjoy making these rugs. The material is not expensive, you can pick it up at op shops or find it in your own craft cupboard, and it’s satisfying to turn balls of left over yarn into something that can actually be used. I enjoyed making the first one so much I called it a ‘therapy rug’! There’s no pattern to the colours, the only rule is whenever I change yarn it’s a different colour to the last. It’s therapeutic because there is no stress at all about the design, it just comes down to a decision at the moment it’s time to pick a new colour.  And the idea of these rugs is to use up all of that left over yarn, that’s why there are not finished rows, rather they run into each other like spirals until the yarn runs out. Then I choose a contrasting colour to continue. This way there are no little bits left over at all.  That’s why this is much better than making a rug out of small granny squares sewn together. And I find sewing all those squares together at the end very tedious! For this rug, I used a 4.5mm hook, so not too small so it doesn’t take too long.

The first thing to do is sort the balls of left over yarn according to size. The very smallest ball of yarn is the one you want to start with, next choose a contrasting colour that looks to be amongst the smallest of the balls left. I’ve even resorting to weighing the balls on a small kitchen scale! This way you get the spiral effect. I’m rather proud how this one turned out, the pattern is quite nice considering there was little planning in it. It’s good to know I have something useful to do with all those annoying left over balls of yarn!

Two Handmade Birthday Cards

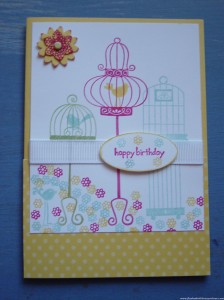
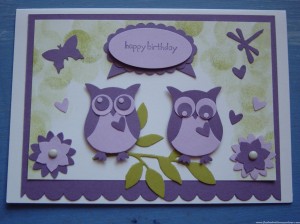
Two good friends from high school celebrated their 40th birthdays last month. A special occasion like this required a special something sent in the mail!

My mother has started making more greeting cards and I must say they are rather good! I chose these two to send to my old friends, and I’ve since heard they both reached their destinations safely! And that was despite rainy weather – there’s always a danger that snail mail will get waterlogged! You don’t get that problem with emails over the internet!

My friend Karen has always kept birds, usually cockatiels, so I thought the pretty card with the caged birds would be nice for her. The owls look rather cute and thoughtful so I sent them to Marina. She has since told me that owls are one of her favourite things, possibly due to being a librarian, but I’m not sure!

Homemade Quilt for Thomas

On the weekend, we got a visit from Nanna and Poppy (David’s dad Brian and his wife Freya) and they came with many gifts, including this special handmade quilt for Thomas!

How very special this quilt is, including a lively print of playing frogs and a print of blue hearts. I’m sure this quilt will get some use, probably in the cot as it’s a bigger size than a bunny rug. Freya is very good at making lovely quilts. I think they would be too tricky for me to try, whenever I cut material it always comes out wonky. And once you cut it you can’t save the material. That’s why I like to crochet, any mistakes I make I can just undo and retry. I guess everyone gravitates towards the crafts that suite them the most.

Besides the quilt, Nanna and Poppy also brought a lot of fresh produce from Stanthorpe, including these tomatoes and zucchinis home grown in their very own garden. We’ve already eaten some in the few days since their visit, but I’m a bit worried that some might waste there is so much! They also gave us several jars of home-made pickles, again using fresh veggies from their garden. It must be so satisfying to eat from your own garden. I know it is and our own garden only has herbs and a lime tree!

They also brought this lovely posey of roses from their garden, now my kitchen smells like roses again! It’s a pity they live so far away, it’s a long three hour drive one way. Hopefully we’ll see nanna and poppy again before too long.

Three Small Things – baby beanie, dishcloth, headband

Here are another three small things I’ve completed in the last couple of days, a baby beanie, a wavey dishcloth and a crochetted headband.

>>> I bought some yarn made from the Wangaratta Mill Shop , part of the Australian Country Spinners, that Lincraft had on special. I’m wanting to find some locally grown and spun yarn, hopefully this is what I’ve been looking for. I really liked this sea green colour and made a beanie for Tom with it. I used a 4.5mm hook and used front post ridges to mark the increases in the crown, then plain down the sides, and finished of with some star-fish looking clusters. I wonder if the nurses will use this beanie? My starfish cluster pattern goes something like this … ch 1, [sk 1 st, (htrb, trb, d-trb, trb, htrb) in next, sk next, dc in next] * repeat to end

<<< I’ve been meaning to make something with this wavey stitch for quite a while and have never gotten around to it. The cotton I used for the pentagon dishcloths was so nice, I decided to use the last of it up to make this cloth, which I might use as a dust cloth for my piano. There are references to this wavey pattern in many places, in the end I used one at eHow. I used a 3.5mm hook for this cloth.

>>> I’m really proud of this new headband, this is the first time I’ve made something like this. I only have one headband, made out of black t-shirt material, and I am so very over black that I need a different colour! So I gave this one a go, using a 3mm hook and some greyish-lilac cotton I bought and still haven’t used until now. I found the pattern after searching google for ‘stretchy crochet headband pattern‘. My pattern is based on this but it is different as I turned for every row.
My version of the stretchy headband pattern
1. ch 8, dc (US sc) in second ch from hook, dc in every ch to end (7 dc), turn
2. ch 1, dc in first dc, dc in second dc, ch 3 skp next dc, dc in next dc, ch 3 skp next dc, dc in next dc, dc in last dc, turn
3. ch 1, dc in ea next 2 dc, dc in 3 ch sp, ch 3, dc in next 3 ch sp, dc in ea last 2 dc, turn
4. ch 1, dc in ea next 2 dc, ch 3, dc in 3 ch sp, ch 3, dc in ea last 2 dc, turn
repeat round 3 & 4 until desired length is reached for firm fit
last round. ch 1, dc in ea next 2 dc, dc in 3 ch sp, dc in next dc, dc in next 3 ch sp, dc in ea last 2 dc
sl st to other end to form ring

Pentagon Dishcloths

I feel a need to keep my hands busy right now, I’m not sure but this might be the ‘nesting’ kicking in. It’s hard when I’m not 100% physically, so I’ve resorted to making dishcloths while I wait for my body to catch up!

<<< I did up this pentagon dishcloth quickly, using a 4mm hook and my own pattern from the top of my head. This dishcloth got put to work immediately in the kitchen after it had it’s obligatory photograph taken! This dishcloth has 4 rows of granny clusters then 3 rows of trebles (US dc).

>>> Recently I did these pair of pentagon dishcloths, using the same pattern as my 1st one except I skipped the picot edge. The second pair has 7 rows of granny clusters and 2 rows of trebles. For these I used a 3mm hook and some finer cotton my mum gave me. I like the colours, I think they are perfect for a cheery kitchen!

To catch a dream (three small things)

The last two weeks have been surreal to say the least, like a walking dream or day-mare. Some thoughtful soul gave this special beanie to David to give to me, it’s what Thomas was wearing in the photo that was taken on his first day. Someone even printed up the photo so I could have it in my room. I didn’t see Tom until the second day as I left the ICU to go to the maternity ward. I clung to this special little yellow beanie during my stay while I was away from my baby, I even imagined it smelled like him! I give thanks to the person who made and donated the beanie, and to the person who took the photos of Thomas wearing it, and also to the person who thought I might like to keep it when our baby went into the humidicrib and no longer needed to wear a beanie.

While we were in the maternity ward, on the meal tray was a paddle pop stick. We guessed they were meant to be for stirring tea and coffee, which we thought was a waste of wood. Imagine throwing all those not needed paddle pops away? What a waste of trees! So I collected a few and made some into dream catchers to pass the time. When we left the maternity ward and David went home to sleep, I told him to take the brown dream catcher to place above his bed. It is meant to be for good luck in catching your dreams so they can come true. I learnt how to make these from school, you just weave wool in and out, around the sticks.

Previous Older Entries