Monster Beanie for a Small Child

I made this monster beanie yesterday, thinking it was going to be a gift for a 1 year old boy next weekend, but it is sooo hot right now, I really think my beanie will be an inappropriate gift! I will just have to make something else that is more summerish! Inspiration for this beanie came from googling images of ‘crochet gift for one year old boy’ then ‘crochet monster hat’, none were quite like mine.

Using some more of the sea green I have left from the Wangaratte Mill, I started by making a beanie. I fitted it to my 1 year old son’s head, to make sure it would fit, using a 4mm hook. The first 6 rows are increasing, the very first round had 16 dc. The 2nd round increasing every 2nd stitch, so it’s 2 dc 1 dc repeated *, which makes 24 stitches in the round. The 3rd round increases 2 dc 1  dc 1 dc, repeated, the 4th round increases 2 dc 1 dc 1 dc 1 dc, repeated, the 5th round increases 2 dc 1 dc 1 dc 1 dc 1 dc. After that, each row just has the same dc as the previous row. To make a beanie for a larger head, you increase the number of increasing rows, to make a smaller beanie you decrease the number of increasing rows. I make rows until the beanie covered my son’s ears. You can make it slightly shorter, or longer if you want a turned up edge. I hope that makes sense to you, because it makes sense to me!

To make the beanie look like a monster I decorated it with two eyes and 4 sharp white teeth! The pattern for the teeth is 1 ch, 2 dc 1 ch 2 dc, 1 sc, 1 sl st, (1 sc, 2 dc 1 ch 2 dc, 1 sc, 1 sl st) x 3, for 4 teeth. Pull and pinch the ch at the tips slightly to make the teeth appear pointed.  For the eyes, I made 2 flat circles in white. 1st round has 12 dc, the 2nd round has 24 as it increases 2 in every st. Then I made 2 smaller black circles, using finer black wool, I threaded the ends onto a needle to sew the eyes together and onto the beanie at the same time. To finish, I edged the eyes with varigated yarn, also from the Wangaratta Mill, to attach the eyes more securely. I think the multi-coloured edge to the eyes makes the monster more friendly looking, as does the wonky tilt to his eyes!

I’m not sure what will happen to this beanie, I might give it away, or use it as a beanie for my son this coming winter. This was so easy to make, if my friends wanted some I’m sure I could whip up some more. I like making these as the colour choice is pretty open ended, which means I can use up some of this yarn that is piling up here!

* my apologies to my fellow Australians who read UK crochet, as this is in US crochet. To convert into UK crochet sc = dc, dc = tr crochet
Small striped bag with flower & Handmade 1st Birthday Card

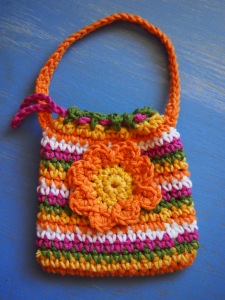
Today is the second 1st birthday in our mother’s group so we have a party to go to, it’s very exciting! I made this small striped bag with a flower as a gift, I hope she likes it!

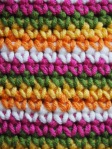
I used 5 colours from my batch of cotton blend, it’s a thick yarn so I used my 4mm hook. It’s a simple bag, changing colours every row of sc using orange, yellow, green, purple and white. I didn’t follow a pattern for the flower either, just did a couple of rounds in yellow ending up with 16 sc, then changed to orange and did 8 petals. Each petals started as 3 ch in every 2nd sc, then the second row is 5 sc into the sp with a sl st to start a new petal. I used fine cotton and needle to do a simple running stitch to attach the flower to the front. For the bag, a sc ch lip for a ch handle to be threaded through, and a larger ch handle with a second row of sc in orange. The one thing I’m unhappy with is this cotton is too thick to thread through my needle so I couldn’t finish off the ends very neatly. Instead I have to weave them in with my crochet hook which means the ends can poke through easily. Eventually there will be some loose ends visible in this bag which will make it look a little rough. Hopefully that will add to the home made character of it!

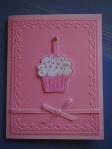
To go with this gift my mum made a special home made birthday card, which is very nice! I’ll also include a small Fisher-Price little people car inside the bag, and of course a book which I always love to give children! Children can never have too many books!

Colourful Crochet Baby Cube

I was going to make a set of these soft baby blocks, and did this first one last year before Thomas was born. Now, I don’t think I’ll make any more quite like this.

I simply made 6 x 10cm squares of various colours in the same thick cotton I used for the drink coasters. They were fairly quick to make up, then I started joining them up into a cube with the black. I chose these colours because these were the brightest colours I had at the time, and the contrasting black is attractive to the eyes of babies. I then packed the inside with stuffing consisting of scraps of material saved from my sewing projects. I was unhappy with how the cube shape came out. If I packed it too much, it started to resemble a sphere! So I had to remove some stuffing, then the cube was a bit sloppy. So if I make any more cubes like this, they will need a firmer stuffing in the shape of a square, and the cube will have to be made to fit the stuffing. Hence why I probably won’t make any more, as I don’t have any stuffing material like that on hand, and I don’t want to buy it as I think it’s too expensive for what it is!

So here is an odd shape to throw into Tom’s toy box. Maybe in future I can make a sphere and a rectangle to match …

In other news, our little family has just got over colds that Thomas caught at a playgroup I took him to last week. That was the first time I’ve taken him to a playgroup and I won’t be taking him back. All we got out of it was the cold! This is the first time Thomas has had a runny nose and only the second time he’s been sick as the first time was a sore throat with fever. It was so awful listening to him breath through a runny nose all night! I know it’s good for his immune system to start building up resistances to these germs, but I don’t think he should spend his entire babyhood sick and uncomfortable. Getting sick only twice in 10 months is doing pretty well so far, considering how much illness is around!

Small Cream and Wine Hexagon Lap Rug

I’m not sure how useful this item I finished yesterday will turn out to be, it’s very small due to the amount of this wool I had. But it was so nice to make, I had to use it all up to make this small rug. It could be used as a baby rug, or maybe a small lap rug.

I’ve known for a while, I’d really prefer to make items using yarn that is locally grown, spun and dyed. This way, you can reduce your carbon footprint – its better for the environment if we use products sourced locally. Before I saw this yarn, any attempt to source something like that was way over priced in my opinion. But I found some assorted blends that were on special in Lincraft, which were from the Wangaratta Mill Shop. This may include synthetic fibres, so they are blended with local wool, but spun locally. I even found a local spinners site that sells drop spindles if I ever buy some raw local fibre.I’ve already made a beanie for Thomas using a sea green yarn from the same Wangaratta package.

This thick yarn has a nice, soft feel and it was a pleasure to make this small rug. But it is a bit small to be very useful, as I only had 3 balls of this type. I used a 7mm hook to make the stitches large and the rug quick to make up.

In other news, I sold my first item on ebay today, my old queen size mattress! We got a new mattress after Thomas was born, and my old mattress has been taking up room and had to go so I started bidding at .50c hoping someone would come and get it, and they did! The experience was a positive one, so I hope to sell a few other things from around the home that need to go. Who knows, maybe I can sell some crochet projects as well?!

Colourful Scrap Rug for a Toddler

This rug started off as a pile of scraps given to me by my mother last year, and is now the second rug like this I’ve done. I’m hoping it will be a useful rug for Thomas.

I really enjoy making these rugs. The material is not expensive, you can pick it up at op shops or find it in your own craft cupboard, and it’s satisfying to turn balls of left over yarn into something that can actually be used. I enjoyed making the first one so much I called it a ‘therapy rug’! There’s no pattern to the colours, the only rule is whenever I change yarn it’s a different colour to the last. It’s therapeutic because there is no stress at all about the design, it just comes down to a decision at the moment it’s time to pick a new colour.  And the idea of these rugs is to use up all of that left over yarn, that’s why there are not finished rows, rather they run into each other like spirals until the yarn runs out. Then I choose a contrasting colour to continue. This way there are no little bits left over at all.  That’s why this is much better than making a rug out of small granny squares sewn together. And I find sewing all those squares together at the end very tedious! For this rug, I used a 4.5mm hook, so not too small so it doesn’t take too long.

The first thing to do is sort the balls of left over yarn according to size. The very smallest ball of yarn is the one you want to start with, next choose a contrasting colour that looks to be amongst the smallest of the balls left. I’ve even resorting to weighing the balls on a small kitchen scale! This way you get the spiral effect. I’m rather proud how this one turned out, the pattern is quite nice considering there was little planning in it. It’s good to know I have something useful to do with all those annoying left over balls of yarn!

February 2011

It’s hard to believe I haven’t posted anything for the whole month of February yet, so I better do it now while I have the chance!

It’s been wonderful finally having Thomas at home, and David home from work too, so we can play happy families. Thomas has been doing very well, drinking his milk and putting on weight, what a good baby! But David had to go to work today, and I’m now on my own with the baby. He’s still sleeping so I’ve got a chance to post up a couple of photos of things I made that I haven’t posted yet.

We bought the bassinet when Tom was in hospital, it was lucky we had a chance to get some things, we also got his cot for when he grows. But the bassinet only came with a frilly quilt not a sheet, and the SIDS guidelines say to remove all the frilly unnecessary stuff. So I made a fitted sheet of my own. I did it very roughly, just hacked at a piece of printed cotton and sewed up the corners. Then I made a pocket around the inside edge, it was very rough with all 4 corners left open. Then I thread some elastic through the pocket with a safety pin. I even forgot I left the safety pin in the pocket and only took it out last night, sewing the two ends of elastic by hand. I was reluctant to use up any more material to make another sheet because Thomas won’t be using the bassinet for long. Luckily my mum bought us a couple more.

I made this little white baby beanie when we were ‘rooming in’ with Thomas in the hospital. I must say the whole experience was very strange. They had us on an overflow ward, and there weren’t many people there so they didn’t pop in very much. They must have thought we were doing so well they just sent us home early. We were supposed to stay for two nights but only stayed for one. They couldn’t find us a single room on the other floor where all the nurses were, and I think they realised it was useless to have me there without David. So far he has been doing all the midnight feeds, and we’re not sure how that will work when he is back at work. We were very lucky last night, baby Tom went 7 hours between feeds, so we were able to get some sleep. I think that’s pretty good for an 11 week old baby!

Well, thanks for the chat! It’s been nice to pop in for a while to make a post. Baby Tom is stirring now and it’s time for a feed, so I must go!

EDIT: I just have to add that about an hour after posting this, Thomas had been fed and was happily having some tummy time on a bunny rug on the lounge room floor. For the first time, he rolled over! He gave himself a real fright, bursting out crying. How cute and sweet that he should have a milestone today. I had to ring daddy straight away to tell him the good news so he doesn’t miss out on too much.

Three Small Things – blanket, beanie, curly worm

<<< I bought 2m of this warm brown fleece last winter from Lincraft, thinking I could make myself a skirt or wrap dress which I didn’t end up doing. So the other day I cut it in half, and then one half was cut in half again to make a 80x80cm square. I then edged it with blanket stitch in a contrasting blue cotton. I didn’t do so well when I needed to sew in more thread. I’m sure there is a trick to it, I just don’t know it. This is like the material the blankets are made of, and the nurses hospital are using these not crochet rugs which have been donated. But I don’t think I’ll edge the next one with hand-stitching, I might use my trusty sewing machine instead!

>>> I made up this beanie using the cream yarn from Wangaratta Mill, which is part of the Australian Country Spinners. If I ever sell anything I make, I would prefer to be using locally made yarn, much like this. I used a 4mm hook and the pattern has the ridges at the increases for the 1st 5 rounds. This one has a turned up brim of 3 extra rounds. I call it a “junior fisherman’s hat” because the look of it reminds me of the beanies fishermen wear on their boats on cold, early mornings.

<<< This curly worm I made for a mobile I’m working on. Its a common pattern, I found one at Art of Crochet by Teresa. You just make a chain, then trb 4 times in ea ch. For a contrasting colour, I did a second round in red with 2 dc in ea trbl. You can make these into bookmarks, Christmas decorations, cats’ toys or anything else you can think of. For this one, I used a 4.5mm hook and it just took me a few minutes, so it’s a fun little project to do.

Small Purple Plarn Basket

This small plarn basket was made from about half a dozen Lincraft plastic shopping bags, so it’s mostly purple with some flecks of white.

I used a 7mm hook and single crochet (UK double). I did a little on this project every now and again, as it hurts my thumb to work with this tough yarn. So from start to finish this project took a couple of weeks.

I finished this basket to decide if it’s something I want to continue doing, or should I just discard my collection of plastic bags? I don’t know if I can find a use for this small basket, making larger ones might be more worth the effort. And it does require effort, the making of plarn baskets is not enjoyable, but the one consolation is that the material is free.

Knowing how to make a basket from recycled plastic bags surely will prove to be a useful skill at one time or another!

Three Small Things – dishcloth, heart, face washer

>>> Here is a face cloth that I edged last night, I simply did one round of double crochet (US sc). This cloth came in a gift pack from the hospital where Tom is staying and it was perfect for a quick edge treatment! I nearly did the edge in blue but decided that would be too boring so did it in a contrasting green instead! The single row looks less frilly I think, so will go well in our growing stash of baby boy goodies. I vowed years ago never to edge face washers with crochet but I succumb to the urge this year while teaching myself crochet. So far I’ve edged a pair of white with purple, and a pair of pink with pink!

<<< I whipped up this variation of Suzetta’s small heart earlier this month. This one has a second round so you can have two colours like I have here. For this one I used my 1.75mm hook. I think this is my favourite heart pattern, thankyou Suzie! I first had a go at this pattern back in January when I was teaching myself how to read crochet patterns, and I’ve come back to this pattern several times so far.

>>> Here is a small ridged green cotton dishcloth that I did up earlier this month using a 4mm hook and the last of the cotton in this colour. I now have two dish cloths this colour, the other green dishcloth I made up last month.  The ridged stitch is at crochetspot.

Pink and Purple Dolly Blankie

It’s my niece’s 4th birthday today, and on her wishlist was a ‘Barbie Doll Blanket’, so I hope this is what she had in mind!

The rug should be pink and purple, apparently. Luckily I had just enough of these colours in my scrap bag to make it. I used up the tiny bit of variated white wool left over from my flowers baby rug, and the bit left over purple dimples yarn which I also used for the purple baby jacket. For the pink flowers, I had a small bit of yarn left over from my childhood when my mum had taught me how to crochet, so that wool is very special, as I’ve been carrying it around with me for a very long time! For the jazzy edge I used a bit of fluffy yarn my mum gave me last year some time. All of these yarns are probably acrylic. If this rug needs a wash, it would need to be gentle or it might fall apart.  It would be best to spot clean it, or a gentle hand wash in cool water and gentle detergent, drying flat in shade should be ok.

It took me a couple of hours to do up the 24 tiny granny squares, then a couple of hours to stitch them all together. I find stitching granny squares together the most tedious, there doesn’t seem to be a quick enough way to do it. I used some cotton and a big needle and tried to get it done in an efficient time. Putting the cute fluffy edge on it only took a few minutes in comparison. I used a 3.5mm hook and the end result measures 18cm x 28cm, just big enough for a Barbie to be able to use as a blankie!

I hope my niece enjoys the things I’ve made for her this year, which includes everything I made for yesterday’s post, as well as the child’s cotton sun hat and the pretty pink and purple bag!
❤ ❤ ❤

Previous Older Entries