The Silver Candle-stick Holders my father made

This pair of candle-stick holders are so very special, they were made by my father around the time my parents were married in 1969.

My father was a jeweller’s apprentice so knew how to make these from brass and then coat them in chrome. One looks a little tarnished now, and I’m not sure how I can clean them and polish them up. Dad suggested I could get them re-chromed, which sounds very complicated to me! I’d rather they stay the way he made them.

These have been passed around between our family members for a while, and now have come back to me for safe keeping. I intend on keeping a small collection of precious items that have been hand crafted by family members. These items are family heirlooms as far as I’m concerned and I will be teaching my son to treasure them. It’s much more precious to have things hand made by your ancestors than other things that have been simply bought mass produced. I hope the collection will demonstrate to my son that its possible to make these things ourselves, that one day he can also choose to make things. So far we have a wide selection of handicrafts in the collection, including carpentry, embroidery, jewellery and of course heaps of crochet. These things are made by family members as far back as my great-grandparents! I also hope the collection will be compact. When passing heirlooms along I do think it’s important that the items are not too cumbersome to keep, that they don’t become a burden and don’t take up too much room.

Check out other items in my collection of family heirlooms if you’re interested! There is more to come …

Homemade 40th Birthday Card

It’s been so long since I’ve blogged! The last few months have been full of looking after baby, he’s been having trouble with his sleeping, but he’s asleep in his cot right now so I finally have a chance to post!

It was months ago when I celebrated my 40th birthday in July with my family, my parents came to visit the day before and we all went to a local Chinese restaurant, the Landmark, for Yum Cha. It’s definitely one of the best Yum Cha places in Brisbane, if not the best. David and I like to go often, we first took Thomas when he was about 5 months old and able to sit up in the high chair. But we don’t have him sitting in the high chair the whole time, sometimes we hold him on our lap. For my birthday we didn’t have a high chair at all, and we all took turns to hold him. A special surprise (I hate surprises, by the way!) from my sister was she organised to send her eldest son Deegan down from Darwin to come to my special birthday lunch! Now, that was a surprise! Mum and dad had to go to the airport on the way to pick him up, which made them late, but of course they couldn’t tell my why they were late because it was a surprise! We ended up waiting an hour for our table, in future I must remember to go early on a Sunday, or make a reservation.

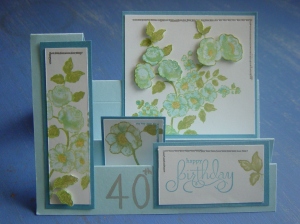
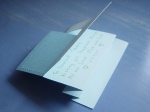
Once again mum gave me a special hand made card. This one looks very unique and tricky. It’s so unusual I wasn’t sure how to open it, but the message was hidden on the back. My mum is very talented, don’t you think?

How to have a simple wedding

David and I decided early last year that we would get married, after he romantically proposed during a holiday at a place called Secrets on the Lake in Montville. The how and when of it was all up in the air. The thought of organising a wedding was very daunting for both of us as we have become real hermits in recent years! But it was pretty obvious to us from the onset that whatever we did, it would have to be very simple and low stress!

By holding the ceremony in the cute and quaint backyard garden of a local celebrant, and only inviting parents to witness it, a relaxing lunch for 6 topped off the day and rain by no means dampened the mood.  The day was all about David and I celebrating our love and making our marriage official, skipping a lot of traditions but keeping the few that were meaningful for us. Below I outline the details of our little wedding for future reference, and how we organised it in about 6 weeks and for a cost of less than $1200 (if you don’t count our rings!).

More

David's Fingerless Gloves

I bought another ball of this lima alpaca wool from Lincraft when it was on special to make another pair of fingerless gloves for David, this time I made up my own pattern to fit.

David has been wearing the first pair of fingerless gloves I made, but they are a little small for him, being too short and tight to pull on. It’s his birthday today, so I just had to make him another pair in matching wool, this time longer and wider. And just in time for winter to be nearly over, too! At least he’ll have them to wear all next winter! This longer pair of fingerless gloves weighs over 60g so took more then 1 x 50g ball of alpaca, and I used a 4mm hook.

My pattern for David’s fingerless gloves
1. ch 36, sl st to join and form a circle, taking care not to twist the chain, ch 2, treble (US dc) in 1st ch on the right of ch 2 to form a ‘cross-stitch’, (sk 1 ch, tr in next ch, tr in sk ch) repeat to end, sl st in top of 1st cross-stitch (18 crosses)
2. sl st into next space, ch 2, treble in top of 1st cross-stitch (sk top of next cross, treble in next space, treble in top of sk cross) repeat to end, sl st in top of 1st cross (18 cross-stitches)
3-13. repeat row 2 until there are 13 rows of cross stitches
14. ch 2, treble in top of cross to the right of ch, ch 10 (thumb hole), sk 2 cross-stitch, sl st in between 2nd and 3rd cross, sl st 2 up the ch, treble in top of 2nd cross, sk top of 3rd cross, treble, treble in top of sk cross, repeat until end, sl st in top of 1st cross (17 cross-stitches)
15. ch 2, treble in top of cross to the right of ch, sl st in thumb hole, 4 dc (US sc) in thumb hole, treble in between next 2 crosses, treble in top of cross to the right to create cross, repeat cross-stitch pattern to end, sl st in top of 1st cross (16 cross-stitches)
16. sl st 1, ch 2, treble in top of cross to the right of ch, sk 1 dc, sl st in next 2 dc, sk 1 dc, treble in between next 2 crosses, treble in top of the 1st of those 2 crosses, sl st in top of 1st cross (16 crosses)
17. sk 1, sl st1, sk 1, sl st 1, sl st 1, ch 2, treble in top of 1st cross left of thumb hole, repeat cross-stitches to end, last one goes in sl st over thumb hole, sl st in top of 1st cross (16 crosses)
18. sl st, ch 2, treble in top of cross (sk 1, treble, treble in sk) repeat to end (16 cross-stitches)
19, 20, 21. repeat row 18

For David’s birthday, I also bought him a father-to-be book with a cute lovey-dovey book mark to go with it. He’s being such a trooper and so supportive of me right now, I wanted to get him something to help him from a father’s point of view. This particular book comes recommended and it made him laugh in the book store when he saw it, so I got it for him. And it’s good timing too, Father’s Day is a week after his birthday!

Also for David’s birthday, we got him an electric mixer! It might not sound like a good present, but it certainly isn’t for me as I won’t be baking! David loves to bake and is very good at it, so a proper machine will make it even more fun for him! If you would like to see some of the things David likes to cook, be sure to check out his cooking blog @ daves-home-cooking.blogspot.com

Happy Birthday, my darling David ❤ ❤ ❤

The Table my great-grandfather made

There is a real story behind this special little table and how it came to be in my possession.

This small bedside or occasional table was made by my great-grandfather Charlie, the father of my father’s mother Mavis. Apparently he was a skilled carpenter, and my understanding is that he hand-crafted the swirl you can see in the middle. This is the only thing I know of that was made by my great-grandfather that is still in our family and I am very privileged to be the custodian of this historical family piece.

This table has obviously had an eventful life, it even has a coffee stain on the top. But I’m not going to touch this, or attempt to restore it. Its just not going to happen. Anything I could do, or anyone else for that matter in my opinion will only take away from it’s character. No way could a ‘fresh coat of paint’ make this look better because it will make something old look new and you will not see it for what it is. New is not always better. It is a very special turn of events that allows this table to be in my possession. You might think this table, being made by father’s grandfather, might have been handed to me by my father but it was not.

When my great-grandfather’s first wife died, he remarried a lady who the family came to call “Aunty Annie”. Mavis and Aunty Annie didn’t get along, so Mavis didn’t inherit her father’s things. Aunty Annie’s best friend was a lady named Margaret, who adopted her niece Beverly. When Aunty Annie died, Beverly inherited her things, including my great-grandfather’s table. But Beverly and Mavis knew each other, and they had  introduced their children to each other. Dennis was Mavis’s son and Heather was Beverly’s daughter, and they are my parents. When my grandma Beverly died a couple of years ago, her daughters agreed I should get the table.

I love the history behind this table, it makes it all the more special. I think its sad we don’t have more things like this in our family, things that are meaningful and made by our ancestors. Old things should be cherished and passed to those who appreciate their meaning. That’s just my opinion!

I hope you enjoyed hearing the story behind this special piece of furniture my great-grandfather made.
❤ ❤ ❤

Red Hearts of Love

All these photos were taken last Sunday morning. When I saw them in my pictures folder together I realised they were all red so that gave me an idea for a post to join in with Ruby Tuesday hosted by Mary at Work of the Poet!

After a couple of hours of me checking the Pink Saturday blogs and he playing a computer game, we got peckish for some breakfast. We were in the mood for our favourite lovey dovey breakfast, sausages and tomato with love heart eggs and mushrooms!

On Saturday, David took me to a Salvo’s store (Salvation Army charity shop). We hadn’t been there before and there were lots of bargain treasures to be found, some of which I decided I coudn’t bring home. One thing I did grab was this very good toy for developing fine motor and hand-eye coordination in very young children. It’s pretty solid, not flimsy, so I grabbed it for $3. In the background you can see a red love-heart bag. I can’t remember where I got it from but I keep some Barbie things in it, it’s so cute. Also in the background you can see my tiny teddies where they live now, sitting on one of the vintage doll’s chairs to keep Barbie company. The doily you can see I believe was made by my great-grandmother, which I hope to try copying one day.

Another bargain treasure we found at the Salvo’s store on Saturday were this pair of lovey dovey coffee mugs. We’ve decided to collect coffee mugs with love hearts on them, as well as other things with love hearts because we are sooo lovey dovey! /awwww… lol! These are probably not so great because the shape means that one is smaller than the other. I don’t like the idea that to be in love one person must be smaller.

Our first love heart coffee mugs we bought were these very cheap ones we saw at the supermarket a couple of years ago. We got four, one broke and has been thrown away. That’s a shame, I really must remember to keep broken crockery for my mosaic projects I hope to do one day. Two of the remaining three mugs have broken handles, so one is now used as my pens holder by my pc. That’s why I’m afraid to use the 3rd mug for drinking as I have a terrible vision of someone spilling hot coffee over them when the silly handle breaks! But they are just too cute to throw away, they are too lovey dovey! When a coffee handle breaks, it can still be recycled into something useful.

I also took a photo of this very cute red chocolate tin. It cost me $5 full of chocolates from Coles online last Valentine’s Day. I havent’ decided what it will be used for yet, but I’m sure it will turn out to be nice. It’s sitting on top of the table my great-grandfather made, which I will do a post about one day.

I didn’t realise how many red love hearts I have about my house!
❤ ❤ ❤

Be sure to check out other Ruby Reds at Ruby Tuesday!

Highlights from this week’s party

Adventures in Glass Fusing

About 4 years ago I did some glass fusing courses as I just love the look of coloured glass.  It was very technical and a bit expensive but by the end I managed to have some pretty things I made myself.

I still have a yin – yang dish that David’s keys and change go into when he gets home, a drink coaster set which we don’t use, plus the 3 pendants that are left, the rest I gave to my father, I presume he sold them in his shop. These were made from 96CoE glass, some of which I still have left over. With some fibre paper strategically placed, I could turn the unfused glass into some pretty beads using the kiln my father gave me.

Recently, my dad found a new invention that simplifies the process of glass fusing so much that you can do it at home in your microwave! Each of the pendants below took at least 40 minutes while we waited for the kiln to cool down, which is only big enough for one small piece. We spent more than a whole day on this, plus three failures, making these 16 pendants not too bad a success rate but very slow going. This is the 90CoE glass, which can not be mixed together with the 96CoE. If the kiln lasts long enough, I hope to eventually get around to fusing all my left over glass into pendants and beads. It looks like you can craft glue recycled magnets to the back of these so they make pretty fridge magnets, but they aren’t strong enough to hold up a postcard. In the image below, the top 3 are a set that goes together, the second row is also a set I call “Peeking Kitties”. David made 5 of these pendants, 3 black ones in the bottom two rows, and 2 green ones on the right of the second bottom row. David has written more about microwave glass fusing on his blog.

Lavendar Afternoon

Last Easter, when we visited David’s father and his fiance in Stanthorpe, we stopped by a lavendar farm and got our very own lavendar plant to grow. So far it seems to have adjusted to the climate change (it can get very cold in Stanthorpe). We gave it a good sized pot and put a lucky grow charm at the base. I’m trying to shape it by pruning lightly. I’m supposed to do this after it finishes flowering I know, that’s why there aren’t as many flowers on it as there otherwise might be.  After the flowers finish, I deadhead them and keep the dried flower. It prefer’s a sunny spot and a good water, but doesn’t like to sit soaking.

After the stresses of the morning, I knew I had to take my stress management into my own hands and decided to make a lavendar bag! I made this one in about 30 minutes and did it by hand, not machine, as I did it for relaxation more than anything. It’s quite easy, this is how I did it.
Fold a scrap piece of pretty material in half with the back of the material on the outside, the front facing each other inside.
If a seam of the lip will fray, hem it first using blanket stitch and some matching coloured thread.
Using backstitch hand sew down the side of each of the two edges.
Turn the bag right way out.
Fold a scrap piece of thin white ribbon in half, put a knot in the end.
Sew the half way point of ribbon about an inch down from the top of the bag.
Put some tablespoons of dried lavendar inside and twist the ribbon around the bag to close it.

On one of our trips to Indoorpilly with David’s mum and his sister Michelle, we stopped by the T2 Tea shop, which is full of relaxing teas.  While we were there, some tea cups and saucers fell from a high shelf, as if of their own accord. One tea cup remained intact, so I declared it a lucky tea cup and bought it! I also picked up a packet of dried lavendar from there. Lavendar tea is very good for stress management and soothing migraines. I didn’t know you could drink lavendar tea like that, and through trial and error this is how I’ve come to prefer my lavendar tea.
Add 2 teaspoons of dried lavendar to a small tea pot with a removable mesh cup.
Fill with boiling water for no more than 2 minutes.
While waiting, jiggle the pot!
Test the colour every 30 seconds to make sure its not too strong.
Add 1 teaspon of sugar per teacup of tea before sipping.
Enjoy!

I remember a song my dad used to sing to me when I was little…
“Lavendar blue, dilly dilly, lavendar green.
When I am King, dilly dilly, you shall be Queen.
Who told you so, dilly dilly, who told you so.
Twas my own heart, dilly dilly, who told me so.”
/awwww