Variegated Plastic Bag Holder

Well, three of these plastic bag holders in almost as many days, I don’t plan on doing too many more of these any time soon!

I made this one for my friend after she saw the photos of my other bag holders on Facebook. We went to coffee and Lincraft yesterday and she picked some yarn she liked. Its a nice variegated acrylic with flecks of green, purple, orange and pink. For this one I used my 4.5mm hook because I started it at the library and didn’t have my 5mm with me, I don’t have a 5.5mm and the 6mm was too large. It still didn’t take me too long to make it up, especially because my husband made dinner so I could finish it!

I’ll probably make more of these, especially if the ‘product testing’ (!) goes well, just not too soon because I have lots and lots of other projects I want to make within the next 2 months. There are so many birthdays coming up, I’m not sure how I’m going to get it all finished!

Pale Green Plastic Bag Holder

I made this second plastic bag holder on Monday, snatching moments here and there while baby slept or played to finish it.

This plastic bag holder is the same as my dark blue one, only a bit longer. This time I used a pale green acrylic my mum gave me, I figured it would be a nice colour for the nursery, and the blue one can go in the kitchen. Again I used a 5mm hook so this would make up quickly.

I already have an order to make one of these for a friend, we just need to find some yarn in a colour she likes. I wonder if anyone else would like me to make them one?

Variegated Slanted Shell Cap

I’m really pleased how this cap turned out, I hope it fits the intended recipient and that she likes it enough to wear it!

For this cap, I used a beautiful variegated yarn from the Wangaratta Mill, which is in Australia. If I had a choice, I would only use locally produced yarn, but of course its amongst the most expensive. Luckily I found this yarn on special! It has flecks of green, purple, pink and blue in it, which is very nice! My guess is this is acrylic, not wool due to the price I got it at, but I might be mistaken as the label did not say.

For this cap I used the 4mm hook and started with 7 rounds of increasing dc. I then tried a new stitch I saw for the first time the other day on youtube called a slanted shell stitch. I had to have a think about how I would do it in a round though. I turned the cap around and went back the other way, starting with 3 sl st before starting the slanted shell pattern. There are 10 rounds of slanted shell in this cap. Finally, I edged it with 5 dc scallops, with a sc in the 3rd dc. This is 24cm along the rim (so 48cm circumference), and its 19cm high.

This cap might be too warm to wear on a hot summer’s day, but hopefully it will make a very pretty autumn cap.

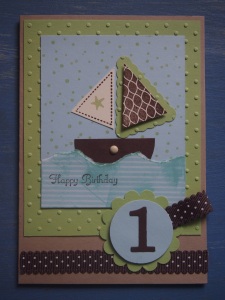
Handmade Green and Blue 1st Birthday Card

This is another simply gorgeous card made by my mother. This one is for Aiden, who turned one on Friday.

On Saturday afternoon we went to Aiden’s grandparent’s house for a party, it was lots of fun with lots of people there. I’m so happy to be able to give these special birthday cards, it’s so much nicer than store bought cards I think.What do you think?

Easy 1st Birthday Cake

I’d highly recommend a cake like this, not just for a 1st birthday, but for older children as well.

There are two great things about this kind of cake. First is, it’s fairly easy to make and decorate. Secondly, there is no cutting of the cake, nor plates and napkins to organise. Guests simply grab a cupcake as they wish!

My husband made the cupcakes using coloured cupcake papers in a muffin tray, and a chocolate cake recipe. Then I iced them using the icing recipe on the pure icing packet. I even got blisters on my thumbs from mixing it, that’s a dedicated mum for you! Then I used writing icing in bright colours to decorate the iced cupcakes. I highly recommend that product because it was so easy to write his name, I just needed a steady hand and sat calmly on a stool at the kitchen bench. It was easy to simply put one letter of his name on six cupcakes, making the cake nice and personal.

On a whim I decided to decorate a few with pink icing! I decided there was nothing wrong with having pink icing on my son’s cake, especially his first birthday cake, as it was us who were celebrating, and as his mum I decided I needed some pink! It has certainly been a hard year that I am glad to put behind us.I’ve been looking forward all year to seeing Thomas eat a chocolate cupcake on his first birthday. For a couple of months there I was worried he wouldn’t be able to do it. Feeding my baby and making sure he ate enough has been my main worry all year, although he’s never been technically underweight he’s always been a small baby and small eater. I was so happy when he finally devoured his cupcake for all to see, making a very big mess!

Surprisingly, or perhaps not so, the pink cupcakes went first. Most of the guests were mums, and we all like a bit of pink sometimes. They were very, very yummy!!

Monster Beanie for a Small Child

I made this monster beanie yesterday, thinking it was going to be a gift for a 1 year old boy next weekend, but it is sooo hot right now, I really think my beanie will be an inappropriate gift! I will just have to make something else that is more summerish! Inspiration for this beanie came from googling images of ‘crochet gift for one year old boy’ then ‘crochet monster hat’, none were quite like mine.

Using some more of the sea green I have left from the Wangaratte Mill, I started by making a beanie. I fitted it to my 1 year old son’s head, to make sure it would fit, using a 4mm hook. The first 6 rows are increasing, the very first round had 16 dc. The 2nd round increasing every 2nd stitch, so it’s 2 dc 1 dc repeated *, which makes 24 stitches in the round. The 3rd round increases 2 dc 1  dc 1 dc, repeated, the 4th round increases 2 dc 1 dc 1 dc 1 dc, repeated, the 5th round increases 2 dc 1 dc 1 dc 1 dc 1 dc. After that, each row just has the same dc as the previous row. To make a beanie for a larger head, you increase the number of increasing rows, to make a smaller beanie you decrease the number of increasing rows. I make rows until the beanie covered my son’s ears. You can make it slightly shorter, or longer if you want a turned up edge. I hope that makes sense to you, because it makes sense to me!

To make the beanie look like a monster I decorated it with two eyes and 4 sharp white teeth! The pattern for the teeth is 1 ch, 2 dc 1 ch 2 dc, 1 sc, 1 sl st, (1 sc, 2 dc 1 ch 2 dc, 1 sc, 1 sl st) x 3, for 4 teeth. Pull and pinch the ch at the tips slightly to make the teeth appear pointed.  For the eyes, I made 2 flat circles in white. 1st round has 12 dc, the 2nd round has 24 as it increases 2 in every st. Then I made 2 smaller black circles, using finer black wool, I threaded the ends onto a needle to sew the eyes together and onto the beanie at the same time. To finish, I edged the eyes with varigated yarn, also from the Wangaratta Mill, to attach the eyes more securely. I think the multi-coloured edge to the eyes makes the monster more friendly looking, as does the wonky tilt to his eyes!

I’m not sure what will happen to this beanie, I might give it away, or use it as a beanie for my son this coming winter. This was so easy to make, if my friends wanted some I’m sure I could whip up some more. I like making these as the colour choice is pretty open ended, which means I can use up some of this yarn that is piling up here!

* my apologies to my fellow Australians who read UK crochet, as this is in US crochet. To convert into UK crochet sc = dc, dc = tr crochet

Small striped bag with flower & Handmade 1st Birthday Card

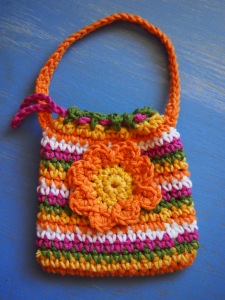
Today is the second 1st birthday in our mother’s group so we have a party to go to, it’s very exciting! I made this small striped bag with a flower as a gift, I hope she likes it!

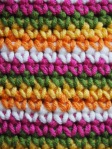
I used 5 colours from my batch of cotton blend, it’s a thick yarn so I used my 4mm hook. It’s a simple bag, changing colours every row of sc using orange, yellow, green, purple and white. I didn’t follow a pattern for the flower either, just did a couple of rounds in yellow ending up with 16 sc, then changed to orange and did 8 petals. Each petals started as 3 ch in every 2nd sc, then the second row is 5 sc into the sp with a sl st to start a new petal. I used fine cotton and needle to do a simple running stitch to attach the flower to the front. For the bag, a sc ch lip for a ch handle to be threaded through, and a larger ch handle with a second row of sc in orange. The one thing I’m unhappy with is this cotton is too thick to thread through my needle so I couldn’t finish off the ends very neatly. Instead I have to weave them in with my crochet hook which means the ends can poke through easily. Eventually there will be some loose ends visible in this bag which will make it look a little rough. Hopefully that will add to the home made character of it!

To go with this gift my mum made a special home made birthday card, which is very nice! I’ll also include a small Fisher-Price little people car inside the bag, and of course a book which I always love to give children! Children can never have too many books!

Colourful ABC 123 Cube for a Baby

Here is an upgrade of my first attempt at a baby block. This one is for a gift, as we are part of a Kris Kringle this year. This cube has numbers and letters on it, as well as a bell inside to make it jingle!

I find our culture of gift giving at times very challenging. I’d rather give gifts as a matter of course, when things arise that someone needs or wants, then you give it to them if you can. I don’t like having to wait for a special occasion, then there is this culture of having to give a gift,  giving gifts the receiver does not need or want. This, in turn, increases the consumerism and rubbish that piles up on our planet. But unfortunately, I am a social creature, being a mammal and all, so I’m compelled to participate in this ritual and not cause offence to my friends and family. But sometimes I just wish we would get more practical with this gift giving thing! I think even gift vouchers are better than an unwanted gift, but for some people this is not in the spirit of it, and they don’t like it. I just loathe to see people on modest incomes waste their money on expensive gifts that are not needed.

A month or so ago we had a hail storm here in Brisbane, which caused some damage to the roof of my friend’s house. She lost her potted basil plants, so a perfect gift for her (I think, anyway), is a new basil plant! I took a cutting from my youngest plant, and put it in a vase on my kitchen sill. Now it has lots of nice new roots and is ready to plant in a nice pot. I just have to get some more potting mix and it will be ready for its new home.

Yet another Christmas, here we come!

How did this happen?? 1 Barbie multiplies to 34 in less than 2 years!

How did this happen? In less than two years one Barbie has multiplied to 34 individuals! I think they must have accumulated in the same way stray cats often do …

At the beginning of 2010, I was reconsidering my choice to be child free, I was also grieving the loss of my old life. In some ways, the loss of my childhood Barbie when I was moving around after my divorce symbolised this. It suddenly occured to me that I wanted to buy a new Barbie! It was a very strange inclination I agree, but for some reason I just wanted a new Barbie to replace the old one I lost, to start over again a new life, and I had the excuse I needed it to make clothes for to practice my crochet and sewing! David didn’t think it was too much of a crazy idea, so he took me to the K-Mart store and I chose a Fashionista doll. She isn’t a collector doll, but not the bottom of the range either. I chose a brunette doll, because when I was a child all my Barbies were blonde and I didn’t even know you could get brunettes, so it was nice to get something different and new. Opening the box and taking her out was like being a child all over again!

Then somehow, the hobby grew from there and now I have 34 dolls! Some were given to me by my mum, a couple of old dolls she found in thrift stores I think, and my sister sent me her daughter’s old and broken Barbies. Some others I found in thrift stores and markets for a dollar each, five came with clothes which I got for $3 each, one is in his original outfit. I bought a set of 8 on ebay recently, that included two dolls from my childhood including the one I had to throw in the bin because it got damaged (so sad, especially as I had kept her for so long, until I was in my early 30s). Last year before I got pregnant I was feeling clucky and bought a little mini baby born, and recently I bought a brand new Ken fashionista doll. I think I’d like to keep the 3 dolls I’ve bought new, and the two vintage dolls I’ve acquired that are the same from my childhood, so that leaves 29 to find new homes for!

I was planning on giving some to charity, but I’m now thinking I’d like to clean them up and make clothes for them all, and see if I can sell them on ebay! I’m not sure I can sell them, but surely a few might? I guess I’ll have to try and see! Seeing as I definately do not need 34 dolls!!!

Colourful Crochet Baby Cube

I was going to make a set of these soft baby blocks, and did this first one last year before Thomas was born. Now, I don’t think I’ll make any more quite like this.

I simply made 6 x 10cm squares of various colours in the same thick cotton I used for the drink coasters. They were fairly quick to make up, then I started joining them up into a cube with the black. I chose these colours because these were the brightest colours I had at the time, and the contrasting black is attractive to the eyes of babies. I then packed the inside with stuffing consisting of scraps of material saved from my sewing projects. I was unhappy with how the cube shape came out. If I packed it too much, it started to resemble a sphere! So I had to remove some stuffing, then the cube was a bit sloppy. So if I make any more cubes like this, they will need a firmer stuffing in the shape of a square, and the cube will have to be made to fit the stuffing. Hence why I probably won’t make any more, as I don’t have any stuffing material like that on hand, and I don’t want to buy it as I think it’s too expensive for what it is!

So here is an odd shape to throw into Tom’s toy box. Maybe in future I can make a sphere and a rectangle to match …

In other news, our little family has just got over colds that Thomas caught at a playgroup I took him to last week. That was the first time I’ve taken him to a playgroup and I won’t be taking him back. All we got out of it was the cold! This is the first time Thomas has had a runny nose and only the second time he’s been sick as the first time was a sore throat with fever. It was so awful listening to him breath through a runny nose all night! I know it’s good for his immune system to start building up resistances to these germs, but I don’t think he should spend his entire babyhood sick and uncomfortable. Getting sick only twice in 10 months is doing pretty well so far, considering how much illness is around!

Previous Older Entries