A little pink bag with a fluffy top

I made this little bag today (last Saturday), I’m thinking this might be a gift for a one year old girl and inside I will hide a small toy or book!

Like almost all of my little bags, I started this one with a row of dc, then 2 extra dc in the end then continue around the other side of the ch dc in the bottom of ea dc, then 2 more dc in the other end, sl st to make a round. The second row is another round of dc. Then I put a part section of the same shell stitch as in the caps I made in this same soft silky acrylic yarn. I did that for 10 rounds, then 2 more rounds of just dc. I then do a round of 2 ch, (sk 1, sc, 1 ch) repeated to end, sl st in 2nd ch. Then the lip is finished with 2 rounds of dc. I then made a long ch to form the drawstring, which is threaded through the 1 ch, 1 sc round. Lastly I added a ch handle, then a second row of dc into that handle. I embellished with some fun fluffy yarn at the lip to add some extra colour and texture.

For this bag I used a 3mm hook to make it more firmer than the hats, when I used a 4mm hook so they come out light and airy. I hope this will make a nice little gift!

My Ten Essential Baby Items

We’re not planning on having another child, but if we change our minds it won’t be before 2 more years as I don’t want 2 in nappies at the same time. So I’m selling my baby things now because I don’t have room to store things we probably don’t need.  If we change our minds I will just buy the few essential things we need. At least now we know what to buy, and what not to buy!

There are lots of pages on the net that list the ‘essential baby items’ you need as new parents. On all the ones I saw they always listed many more items than you actually need, it’s almost as if these sites are sponsored by these products and just want you to buy extra stuff! Having a baby is worse than a wedding in this way, they see you coming and try and sell you all sorts of junk you do not need. I want to list here the things we think we do need, just in case we change our minds about another baby.

1. convertible car seat
This of course is a no brainer, they say they won’t let you leave the hospital without one in your car. Although no one checked our car when we left the hospital with our son! The question is, do you get a convertible or one with a detachable baby carrier? We got a convertible so it will last us for 4 years, these things are pretty expensive! The detachable baby carrier would be really nice but you can only use it for about 6 months so its very expensive, although you can hire them for a lot cheaper.

2. bassinet on wheels
I just loved my love n care bassinet (sorry for the free advertising there). I got white so it’s nice for both a baby boy or girl. It had wheels so I could move it easily around the house as I needed, you can also detach the bassinet from the stand which I rarely did as I didn’t want to wake the sleeping baby while I did it. You only use this for a few months though, until they can sit up or roll over. Our son was premmie, so we got to use ours for a few extra months than usual. It makes it so much easier to put your baby down and pick him up, if he is in a little bassinet. If I have to buy another one, I’ll just get it second hand from ebay.

3. convertible cot
Again we got white, which is good for a boy or girl, we got the 3 way kind which can not only be used as a toddler bed, but also as a little sofa. We will get years use out of this cot even if we only have the one child.

4. high chair with wheels
You don’t need a high chair until they are 6 months old, but I must remember the next one we buy has to have wheels! If we have to buy another one, it will be a good one as you use this for quite a while.  I’m always moving Thomas around in his high chair, but the one we have now is a cheap plastic one from Big W without wheels, so I have to lift it to move him around. Also this one is not easy to clean even though it said it would be, but I think all high chairs are probably hard to clean. A baby eating is a very messy affair!

5. reversible, light weight pram
I had a romantic vision of carrying my baby around in a sling all the time, so we bought 3 slings. We weren’t sure we even needed a pram and waited until after he arrived to see. But our son was premmie and too tiny for the slings as it turned out. I still remember the relief I felt the day we finally bought a pram and were able to go shopping without carrying him around. We got a wonderful reversible pram where you can choose to have your baby rear facing or front facing. We had him rear facing for most of the first 12 months, it was so nice to be able to see him sleeping happily in it while we had some time out at the shops. I practised folding it up and putting it up many, many times in the shop before we left so I was sure  I could do it. It’s not too big to be too clumsy, just big enough to do the job. The only difference I would make would be to have more room underneath for my bags, and a drink holder in the handle.

6. a wooden rocking chair
I was lucky enough to borrow an old fashioned, wooden rocking chair from a neighbour. This turned out to be a god send as it was the only thing that would help my baby to sleep for many months. Surprisingly, I found you don’t need one with padding, so you can rule out the expensive upholstered breastfeeding chairs with stools. I was rarely in the chair for very long, as my baby nodded off so quickly, it worked so well. An old, second hand one would work just fine.

7. baby bag or similar
I resisted buying one of these for a lot longer than I should have, using a simple bag crammed full of the stuff you need to carry around with you when you have a baby. I thought they were unnessecary. Reality taught me that this is a very handy thing to have, and I love the cheap one I picked up from K-Mart. It has a little change mat that folds out, but I have only used that once or twice. It has compartments that make finding things easier, so a similar bag would be fine, just a one compartment bag was not good enough. Also, it has a good handle with extra padding which is important because it can get heavy and sometimes you are carrying it, but thankfully not too often.

8. portacot and portable highchair
Thankfully these things have been borrowed, and were useful when we had to do the obligatory visiting rounds of the extended family at Christmas. The portacot is also now getting used in the office as an extra playpen. I can pop him in there if I don’t want him crawling around in the pc wires.

9. pull apart play pen
This has also been borrowed, and is useful pulled apart and set up in different places in the loungeroom to keep Mr Crawler away from the TV. Also, we use it to close off the loungeroom area when I don’t want him in the kitchen.

10. safety gates
We are just using these now as my son is big enough to crawl around and explore the whole house. These are especially important because we live in a townhouse with stairs, so we have them set up to stop him from escaping up them without us being right there.

And I’ll tell you what you don’t need, you don’t need a change table, nor expensive matching furniture. I just use a $20 plastic change mat on top of what will become Tom’s study desk. We’re keeping one sling for when we go to the markets which is a place you do not want to take a pram, despite some people insisting on it. The other two slings I’m trying to sell as we’ve never used them. You don’t need fancy baby shelves or baby drawers and you certainly don’t need to paint your nursery! How ridiculous is that, painting a room especially for a baby. Paint your walls off-white once a decade or two, save your time and money, and it goes with everything! I bought some small and cheap $2 baskets to keep his clothes in, which I can move around to his change table, laundry and some old shelves I have in his room. I also keep some toys in these baskets as I got half a dozen and they’ve been really handy.

A bouncinette was handy, but only usable for a few short months. When he flipped it over it was time to put it away. And when they can’t crawl you can just put them on the floor. I don’t think we really needed the play mats either, certainly not two, you can just use any rug or pillow. Although the a-frame was used for several months before he could crawl so maybe another one of those would be good. We were given so many clothes, it was unbelievable, we didn’t buy any clothes for months and months, and when we finally did we didn’t really need to, we just wanted to. And the same was for toys. Whenever possible I choose unisex colours, so the clothes and toys can be recycled for any baby. I think that’s much better for the environment, it increases the chance of things getting used by another baby. Maybe it will be ours!

Handmade Green and Blue 1st Birthday Card

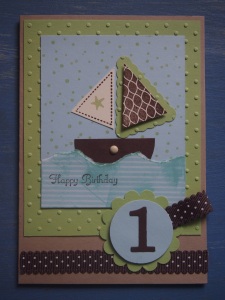
This is another simply gorgeous card made by my mother. This one is for Aiden, who turned one on Friday.

On Saturday afternoon we went to Aiden’s grandparent’s house for a party, it was lots of fun with lots of people there. I’m so happy to be able to give these special birthday cards, it’s so much nicer than store bought cards I think.What do you think?

How to have A Low Stress First Birthday Party

I did a little research before organising my son’s first birthday party and I must say I’m really surprised at the level of pressure out there to perform when organising this event, when personally I find that very unnecessary!

Themes? Seriously? You don’t need that. For goodness sake, talk about stressing yourself out when you don’t need to! I just strung up a couple of balloons with some recycled ribbon! Prettily printed invitations sent in the snail mail? Come on! Just email your friends, easy! Thankyou bags? Maaaybbeeee, if you really want to, but doesn’t that make it all a bit too formal? I’d rather have a relaxed affair where the mums and babies can have a good time. Well, I hope my friends had a good time at our party. We just had it at the pool area of my gated commuity, where there was plenty of space. I could have invited more people, several did say they wanted to come. But I was worried about the weather forecast which predicted rain, then we would have to all cram into my small house, which would have been ok, but not as nice. Luckily, it didn’t rain. But I do think it’s nicer to have smaller gatherings, then I can relax too, and get to chat to everybody. If I had everyone over on the same day, it would have been far too rushed and hectic, and I would have worried about neglecting some of my guests. It was far nicer, for example, to have my brother and family visit on the previous Sunday so we could hang out as a family without a bunch of people they didn’t know.

One dilemma I did have was the question of gifts. If you read my blog, you might know I’m not really keen on our tradition of gift giving. But I don’t want to be a kill joy either, nor do I want to offend my friends and family. So I did some research on this topic and discovered in some forums, that some people have quite a passionate opinion on this. I would have preferred to have said in the email ‘please, don’t bring gifts’ but in my experience, that never works and some people always bring gifts anyway, no matter what you say. I found some people find it really sad and it takes the fun out of it for them. I also read that it was polite etiquette not to mention gifts at all, that to say ‘no gifts please’ implies that people should bring gifts, which some people think is rude!

My husband was home from work on holidays, so we decided we would put some nice nibblies on for the grown ups, and I decided not to mention gifts at all. That way, if people wanted to bring gifts, it was up to them if they wanted to, and at least we put on some food as a thankyou. I do think that if people bring gifts, they shouldn’t have to bring food as well. It’s not that hard to put on a bit of food. My husband baked some pesto and sweet chilli scrolls, marinated chicken wings and rosewater biscuits which were very popular. I made up a fruit platter and some dips with crackers. To further reduce stress, I tried to open gifts as guests arrived. This way there would not be a big parade of gifts everyone has to sit and watch, which I don’t like. Unfortunately, I didn’t quite manage it as three mums arrived at the same time when we were busy, so we opened their gifts after we did the cake ritual.

The fun thing is, I now have presents to make for 5 more babies as they all turn one soon, because Thomas was the eldest in our mothers group!

Easy 1st Birthday Cake

I’d highly recommend a cake like this, not just for a 1st birthday, but for older children as well.

There are two great things about this kind of cake. First is, it’s fairly easy to make and decorate. Secondly, there is no cutting of the cake, nor plates and napkins to organise. Guests simply grab a cupcake as they wish!

My husband made the cupcakes using coloured cupcake papers in a muffin tray, and a chocolate cake recipe. Then I iced them using the icing recipe on the pure icing packet. I even got blisters on my thumbs from mixing it, that’s a dedicated mum for you! Then I used writing icing in bright colours to decorate the iced cupcakes. I highly recommend that product because it was so easy to write his name, I just needed a steady hand and sat calmly on a stool at the kitchen bench. It was easy to simply put one letter of his name on six cupcakes, making the cake nice and personal.

On a whim I decided to decorate a few with pink icing! I decided there was nothing wrong with having pink icing on my son’s cake, especially his first birthday cake, as it was us who were celebrating, and as his mum I decided I needed some pink! It has certainly been a hard year that I am glad to put behind us.I’ve been looking forward all year to seeing Thomas eat a chocolate cupcake on his first birthday. For a couple of months there I was worried he wouldn’t be able to do it. Feeding my baby and making sure he ate enough has been my main worry all year, although he’s never been technically underweight he’s always been a small baby and small eater. I was so happy when he finally devoured his cupcake for all to see, making a very big mess!

Surprisingly, or perhaps not so, the pink cupcakes went first. Most of the guests were mums, and we all like a bit of pink sometimes. They were very, very yummy!!

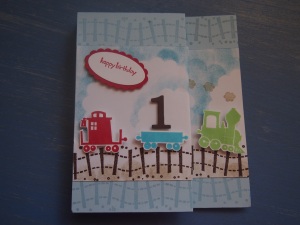
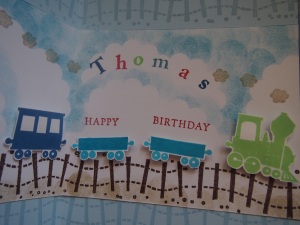
Handmade 1st Birthday Card for Thomas

Thomas turned one nearly a month ago, but we’ve been so busy catching our breath after a very busy Christmas season, this is the first chance I’ve had to blog about it!

This was our first ‘proper’ Christmas with Thomas, as his first Christmas was spent in the hospital nursery, and I was still in hospital that day myself. That’s why we decided we should make an extra effort this season, and visit everyone in the family, which we managed to do, except for seeing my sister and her family in Darwin. We hadn’t gone anywhere all year, with Thomas being so small I didn’t feel confident enough. So Christmas was a very busy season for us indeed this year, and we’ve decided we should spread things out a bit better next year so it’s not so overwhelming!

One thing we can’t change though is Thomas’ birthday, which is on December 14th, right when things start to get busy. We had to have a party of course, in fact we celebrated all week with visits from family and friends spread out so our small home would not be too crowded in case it rained. Thankfully it didn’t rain! My mum came to visit Thomas on the day though, and brought gifts and this very special handmade 1st birthday card.

I just adore my mum’s handmade greeting cards, don’t you? They are so special. I’m trying to convince her to try and sell some, I think they might be popular!

Monster Beanie for a Small Child

I made this monster beanie yesterday, thinking it was going to be a gift for a 1 year old boy next weekend, but it is sooo hot right now, I really think my beanie will be an inappropriate gift! I will just have to make something else that is more summerish! Inspiration for this beanie came from googling images of ‘crochet gift for one year old boy’ then ‘crochet monster hat’, none were quite like mine.

Using some more of the sea green I have left from the Wangaratte Mill, I started by making a beanie. I fitted it to my 1 year old son’s head, to make sure it would fit, using a 4mm hook. The first 6 rows are increasing, the very first round had 16 dc. The 2nd round increasing every 2nd stitch, so it’s 2 dc 1 dc repeated *, which makes 24 stitches in the round. The 3rd round increases 2 dc 1  dc 1 dc, repeated, the 4th round increases 2 dc 1 dc 1 dc 1 dc, repeated, the 5th round increases 2 dc 1 dc 1 dc 1 dc 1 dc. After that, each row just has the same dc as the previous row. To make a beanie for a larger head, you increase the number of increasing rows, to make a smaller beanie you decrease the number of increasing rows. I make rows until the beanie covered my son’s ears. You can make it slightly shorter, or longer if you want a turned up edge. I hope that makes sense to you, because it makes sense to me!

To make the beanie look like a monster I decorated it with two eyes and 4 sharp white teeth! The pattern for the teeth is 1 ch, 2 dc 1 ch 2 dc, 1 sc, 1 sl st, (1 sc, 2 dc 1 ch 2 dc, 1 sc, 1 sl st) x 3, for 4 teeth. Pull and pinch the ch at the tips slightly to make the teeth appear pointed.  For the eyes, I made 2 flat circles in white. 1st round has 12 dc, the 2nd round has 24 as it increases 2 in every st. Then I made 2 smaller black circles, using finer black wool, I threaded the ends onto a needle to sew the eyes together and onto the beanie at the same time. To finish, I edged the eyes with varigated yarn, also from the Wangaratta Mill, to attach the eyes more securely. I think the multi-coloured edge to the eyes makes the monster more friendly looking, as does the wonky tilt to his eyes!

I’m not sure what will happen to this beanie, I might give it away, or use it as a beanie for my son this coming winter. This was so easy to make, if my friends wanted some I’m sure I could whip up some more. I like making these as the colour choice is pretty open ended, which means I can use up some of this yarn that is piling up here!

* my apologies to my fellow Australians who read UK crochet, as this is in US crochet. To convert into UK crochet sc = dc, dc = tr crochet

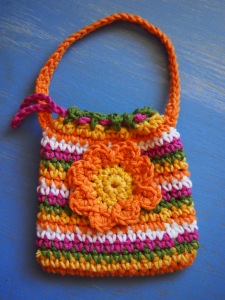
Small striped bag with flower & Handmade 1st Birthday Card

Today is the second 1st birthday in our mother’s group so we have a party to go to, it’s very exciting! I made this small striped bag with a flower as a gift, I hope she likes it!

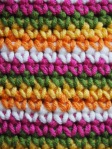
I used 5 colours from my batch of cotton blend, it’s a thick yarn so I used my 4mm hook. It’s a simple bag, changing colours every row of sc using orange, yellow, green, purple and white. I didn’t follow a pattern for the flower either, just did a couple of rounds in yellow ending up with 16 sc, then changed to orange and did 8 petals. Each petals started as 3 ch in every 2nd sc, then the second row is 5 sc into the sp with a sl st to start a new petal. I used fine cotton and needle to do a simple running stitch to attach the flower to the front. For the bag, a sc ch lip for a ch handle to be threaded through, and a larger ch handle with a second row of sc in orange. The one thing I’m unhappy with is this cotton is too thick to thread through my needle so I couldn’t finish off the ends very neatly. Instead I have to weave them in with my crochet hook which means the ends can poke through easily. Eventually there will be some loose ends visible in this bag which will make it look a little rough. Hopefully that will add to the home made character of it!

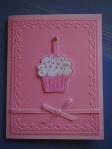
To go with this gift my mum made a special home made birthday card, which is very nice! I’ll also include a small Fisher-Price little people car inside the bag, and of course a book which I always love to give children! Children can never have too many books!

Homemade Gift Tag for a Young Child

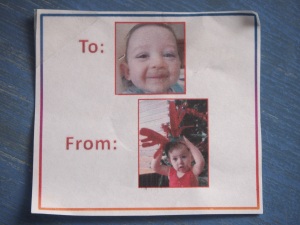
I love this home-made gift tag made by our friend Lyndal for this year’s Secret Santa!

Isn’t technology great? To make this simple gift tag, perfect for a young child, all you need is a colour printer and access to the internet. Lyndal found a picture of Thomas on my facebook page, and printed it up along with a picture of her daughter, Isabella. And I just love the cheeky grin in this photo, when Thomas has chocolate custard smeared all over his face! This kind of gift tag is perfect for young children who are learning to read.

Thanks for this wonderful idea Lyndal, I think I might just have to use it myself this Christmas!

Colourful ABC 123 Cube for a Baby

Here is an upgrade of my first attempt at a baby block. This one is for a gift, as we are part of a Kris Kringle this year. This cube has numbers and letters on it, as well as a bell inside to make it jingle!

I find our culture of gift giving at times very challenging. I’d rather give gifts as a matter of course, when things arise that someone needs or wants, then you give it to them if you can. I don’t like having to wait for a special occasion, then there is this culture of having to give a gift,  giving gifts the receiver does not need or want. This, in turn, increases the consumerism and rubbish that piles up on our planet. But unfortunately, I am a social creature, being a mammal and all, so I’m compelled to participate in this ritual and not cause offence to my friends and family. But sometimes I just wish we would get more practical with this gift giving thing! I think even gift vouchers are better than an unwanted gift, but for some people this is not in the spirit of it, and they don’t like it. I just loathe to see people on modest incomes waste their money on expensive gifts that are not needed.

A month or so ago we had a hail storm here in Brisbane, which caused some damage to the roof of my friend’s house. She lost her potted basil plants, so a perfect gift for her (I think, anyway), is a new basil plant! I took a cutting from my youngest plant, and put it in a vase on my kitchen sill. Now it has lots of nice new roots and is ready to plant in a nice pot. I just have to get some more potting mix and it will be ready for its new home.

Yet another Christmas, here we come!

Previous Older Entries